


Tis the season to get crafting! We’ll all be spending more time at home this holiday season, so why not get creative?
We’re all heading into a Christmas season that’s totally unlike anything else we’ve known. Many of us will be sticking to our homes, possibly with irritable kids.
You may be wondering just how you can keep yourself/your kids occupied during this stressful time. The answer is to get crafty. Here are nine amazing Christmas crafts that are fun for the whole family!
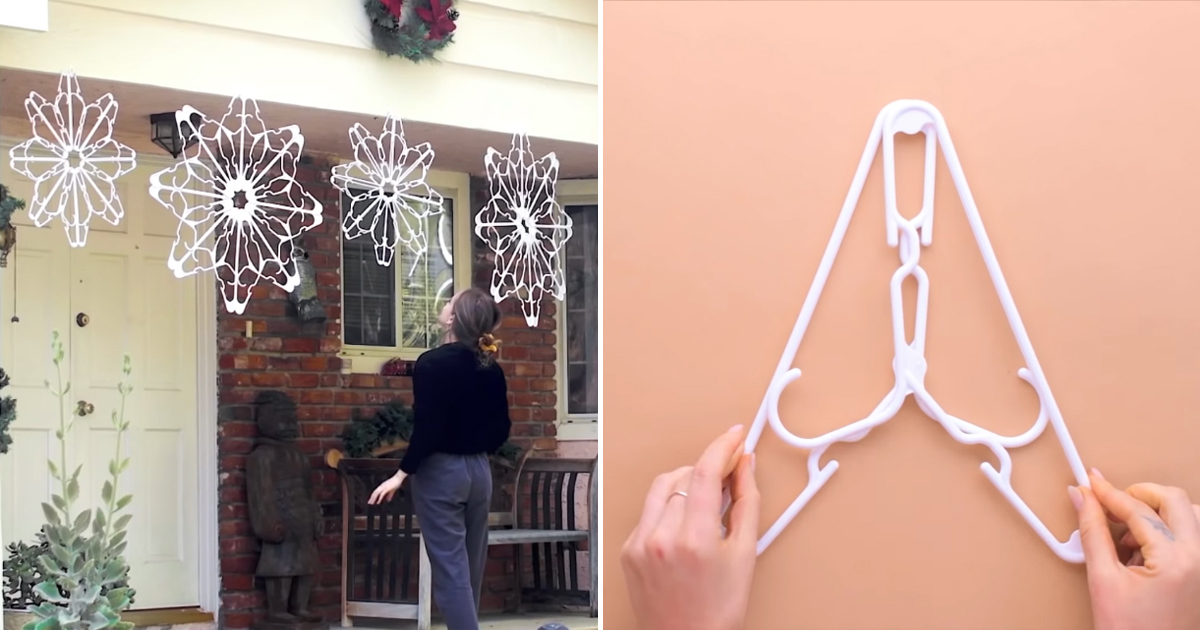
1. Hanger snowflakes

Coat hangers have a way of accumulating. If you have extra ones you don’t need, then why don’t you make some snowflakes out of them?
Just glue two hangers together with the hooks overlapping the other hanger.

Then glue eight of these pairs (16 overall hangers) next to each other, and you have a snowflake!
2. A seedy Christmas card (No, not like that.)

If you want to make a Christmas card that people will be sure to remember, then why don’t you make one that grows plants!? Yes, really.
All you need to do is place some scrap paper, like old newspaper, into a blender. Then add water and blend.

After that, add the seeds, stir them around and strain the mixture.
Spread the pulp thinly across something like a baking tray and place a towel on top.

Leave it to dry. Eventually, the pulp will become hard, and all that’s left is to fold it, decorate it, write it and mail it out.
Explain to your recipient that the card turns into plants. All that they need to do is tear a part of the card off, bury it into a plant pot with soil and add water.
3. Turn a normal candle into a Christmas candle

All you need, in addition to the candle, are some Christmas napkins and a hairdryer.
Firstly, separate the layer of the napkin that has the Christmas pattern from the blank layer. Then wrap the decorative layer around a candle. Lastly, blast a hairdryer at the wrapped napkin and watch the paper meld with the wax.
4. Turn an old glove into a gingerbread man stuffed toy

Cut off the middle finger and sew the hole up. Then cut deep into the space between the little finger and the ring finger, so that it about matches with the depth of the thumb and sew that up. Then stuff it and sew the hand hole up. Lastly, attach the eyes, mouth, buttons and whatever else you like.
5. Turn a lightbulb into a snowman ornament

Just wrap a ribbon around the bulb to form a scarf. Put a circular piece of construction paper over the threading to form the brim of a hat. Paint the paper and threading black and draw a face near the thread. Make sure you hang him on a sturdy branch.
6. Turn a bottle into some standing stockings

Cut a plastic bottle so that you have an open cylinder. Place that and the end of the bottle onto some cardboard. Cut the cardboard around the bottle. Get a Christmassy looking cloth and wrap it around the bottle/cardboard.
Fold in the cloth around the top of the bottle end and side of the cylinder. Then glue gun/sew the material together. Fold the cloth around the top of the bottle and decorate!
7. Turn old coffee pods into bell decorations

Just paint the pods gold (or if you like their original color, then keep them as they are.) Stack two pods op top of one another. Cut holes into the tops of the pods. Thread a ribbon through the pods. Tie off one end of the ribbon.
Then take the top stacked pod off the other pod and take it out of the ribbon. Turn it around and place it on the other end of the ribbon. Tie off this end of the ribbon.
8. Turn pine cones into decorative flowers

Just cut the pine cone apart and glue the bottom of the pine cone to what you want to decorate. It’s as easy as that!
Please SHARE this with your friends and family.

