


We can never go wrong buying crafts made from seashells. Whether it’s a seashell-decorated ball, a garden ornament, or even wind chimes.
The beauty of seashells can always suit the season and your personality, especially if you love going to the beach.
One of the best characteristics of seashells is that they compliment any area of our home.
They’re perfect in our garden, in our kitchen, living room, or even inside our comfort room.
You can’t go wrong with seashells.

But like any furniture or decor, crafts made from seashells will be broken at some point in time and can’t go back to their original form.
Worry not, we have good news.
We can convert this broken craft into something beautiful. RNS crafts has created a nifty video to show us how.

As of writing, the video has reached over 1.7 M views already on her YouTube account. Some assumed the project would end in a lamp cover or candle holder.
But at the end, you’ll see it’s a stunning plant holder. A perfect decoration for any table.
Many subscribers of RNS crafts commented that they would definitely do this kind of project. Interested in this yourself?
Follow the steps below.

You’ll need the following materials:
- Seashells
- Glue Stick
- 1 balloon
- a string of plastic pearls or other trimmings of your preference.

The instructions:
- If you’d like, mark how high you’d like your planter to come on the balloon with a sharpie to help guide you.
- Using the glue gun, place a dab of hot glue on the bottom center of the balloon to adhere your first shell.
- Place the first seashell, then adhere to the second one using the balloon’s shape as a guide.

- Repeat the procedure up until you’ve achieved the shape and height you’d like for your planter.
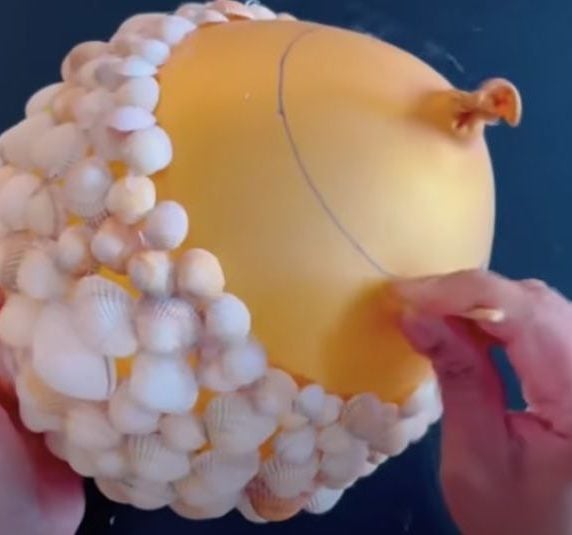
- Let the glue dry first.
- For the final step, pop the balloon carefully and remove it from the craft.

- Take your string of pearls or other trimmings and carefully adhere them around the top of the planter using the glue gun.

And there you have it!
You will be having a beautiful plant holder that you can place on the top of your study or working table.
People had a lot to say about this crafting project in the video comments. Some even came up with their own creative ideas.
One viewer wrote, “Really unique! I was wanting to see what it would look like upside down with an auto tea lite in it.”
Another said, “I like this idea. I would suggest putting the glue directly on the shell you are APPLYING to ensure it’s getting full contact rather than guessing where it will touch the shells already attached. 😁👍 beautiful! you could also add the pearls to the bottom in a circle to make like a stand.”

Given that we are discussing something from nature, if you make this project you’ll be doing the environment a big favor by repurposing the seashells instead of throwing them away.
Get the full tutorial in the video below!
Please SHARE this with your friends and family.


